A creamy, smooth and lemony refreshing hummus with a blender recipe that will change everything you know about hummus. Why? It has no tahini, and it’s made in a blender. It is simple to make yet so delicious that you’ll want to scoop it out directly from the bowl.
I have been buying hummus at Costco for a long time. It always ended it up spoiling before we consume it all. Until I decided it was enough and I need it my own recipe. I am so glad I did, this is far better than the one I was buying and is also cheaper.
Hummus is handy when you want to follow a healthy, clean-eating lifestyle. It is packed with nutrients and vitamins and is a good protein source. On top of that, it is delicious.
But I had two challenges: I never buy tahini and don’t have a food processor. So I had to make it work with my handy ingredients and equipment.
And it worked beautifully, or should I say deliciously.
Ready? Grab your apron, and let’s start mixing.
What is hummus?

Hummus is a popular Middle Eastern dip or spread. It is made primarily from cooked and mashed chickpeas (or garbanzo beans) blended with various ingredients.
This dish has been around for centuries. But, in recent years, hummus has gained popularity for its health benefits. It is a good source of plant-based protein, dietary fibre, and various vitamins and minerals. Also, it is naturally gluten-free and suitable for vegans and vegetarians.
The traditional hummus recipe typically includes cooked chickpeas, tahini (a paste made from sesame seeds), lemon juice, garlic, olive oil, and salt. These ingredients are combined and processed to create a smooth and creamy consistency.
However, this recipe is far from being traditional since it is a hummus with a blender and without tahini.
What tool to make hummus?
Nowadays, people use equipment like food processors and blenders to make hummus. And we give for granted all these handy tools. But it wasn’t always like this.
Before the invention of electricity, people used mortar and pestle to smooth and make creamy hummus. And still, there are places where people don’t have access to electricity, and they make their hummus this way. Others, as well, prefer to cook their food manually. And that is also perfectly fine.
For this recipe, I will show you how to make hummus with a blender, but feel free o use any other equipment you like.
Additionally, you will need a mixing bowl, a Knife and Cutting Board, Measuring cups and spoons. Oh, and remember a spatula or spoon to help you scrape down the sides of the blender.
Is it cheaper to make or buy hummus?
If you are still doubting whether it is cheaper to make or buy hummus, let me clarify it for you. Homemade hummus is way cheaper than the one you buy at the grocery store.
A 260g container of hummus in Walmart sells for $3.47. In contrast, a bag of dry chickpeas of 900g sells for the same price. With a bag of chickpeas of that size, you can make 6 times the amount of hummus you buy for $3.47.
Not only that, homemade hummus has other benefits. It is not only about saving a couple of pennies. Making your hummus at home keeps you from all the food additives and preservatives, ultimately making it a healthier choice.
How to make hummus with a blender
You might need to work a little on this recipe because I didn’t use canned chickpeas. Although you can use canned beans, I am convinced my hummus with a blender was so creamy because I made it from scratch.
Wash and rinse the dry chickpeas and place them in the instant pot with enough water to cover the beans—no need for soaking.
Cook for 70 minutes on the multigrain settings.
If you don’t have an instant pot, use the pressure cooker but adjust the amount of water so your beans don’t burn.
Once the chickpeas cooks, wait for them to cool down to assemble your hummus recipe with the blender.
Add the drained chickpeas along with the rest of the ingredients to the blender.
Start blending on low speed, gradually increasing to high speed. Blend until the mixture is smooth and creamy.
If necessary, stop occasionally to scrape down the sides of the blender to ensure all ingredients are incorporated.
In case the mixture is too thick, add water from the boiled beans gradually, one tablespoon at a time, while blending until you reach the desired consistency. Blend briefly after each addition to incorporate the water.
Taste the hummus and adjust the seasonings if needed. Add more salt, lemon juice, or garlic, according to your preference.
Once the hummus reaches a smooth and creamy texture, transfer it to a serving bowl or container.
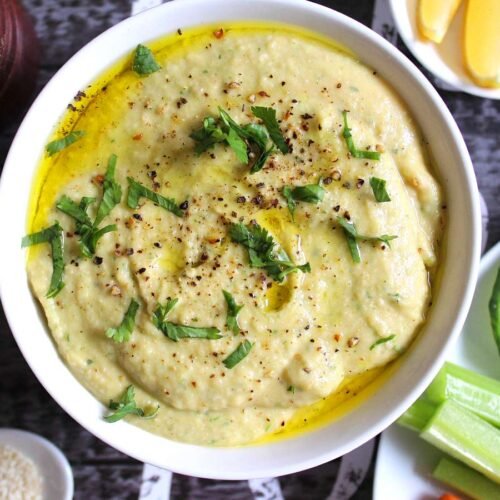
You can drizzle a little extra olive oil over the top of the hummus and sprinkle with paprika or chopped cilantro for garnish. That is if you want picture-perfect hummus.
Serve the homemade hummus immediately or refrigerate it for a few hours to allow the flavours to meld together.
Note: If the blender struggles to blend the ingredients smoothly, you may need to stop and scrape down the sides more frequently or add more liquid (water or olive oil) to help with blending.
Enjoy your homemade hummus with your favourite dippers or as a spread in sandwiches and wraps!
Why is my hummus not blending?
If your hummus is not blending well, there are a few possible reasons. First, check if there is enough liquid in the mixture. Add small amounts of water, olive oil, or lemon juice gradually to provide more moisture.
Avoid overloading the blender by blending smaller batches if needed. Stop the blender and scrape down the sides to ensure even mixing.
Also, ensure that the chickpeas are well-cooked and soft. If these adjustments don’t help, consider using a more powerful blender.
With patience and troubleshooting, you should be able to achieve a smooth and creamy hummus consistency with your blender.
How do you spice up boring hummus?
Now let’s get real here. Hummus can be boring if you use the same old ingredients over and over again. The good part of learning to make hummus with a blender at home is that you can change that once and for all.
You can let your taste bug fly and play with your favourite ingredients. And why not? Looking for inspiration online to brighten up your hummus is also allowed.
For my hummus recipe, I use a tone of lime, cilantro, the king here, and garlic and onion powder, which add more flavour than raw.
Some ideas to spice it up
But that is my favourite hummus flavour. In exchange, you can be bold and try one of the following ideas:
- Roasted Red Pepper: Add roasted red peppers to your hummus for a smoky and slightly sweet flavour. You can use store-bought roasted red peppers or roast them yourself. Blend the roasted red peppers with the hummus ingredients to infuse the flavour throughout.
- Sun-Dried Tomatoes: Sun-dried tomatoes provide a rich and tangy taste to hummus. Soak them in hot water to soften them before adding them to the hummus mixture. Or blend them directly into the hummus or chopped and mixed in for a chunky texture.
- Spices: Experiment with different spices to give your hummus a unique twist. Some popular options include smoked paprika, cayenne pepper, chipotle powder, curry powder, or even a pinch of cumin.
- Fresh Herbs: Incorporate fresh herbs like parsley, basil, or dill into your hummus for added freshness and aroma. Chop the herbs finely and mix them into the hummus after blending to maintain some texture.
- Citrus Zest: Grate the zest of lemon, lime, or orange into your hummus for a citrusy punch. The zest will add a bright and refreshing note to the flavour.
- Garlic Variations: Try experimenting with different garlic variations. Roasted garlic adds a sweet and mellow flavour. At the same time, caramelized garlic offers a rich and nutty taste.
- Heat it Up: If you enjoy spicy flavours, add a kick to your hummus by incorporating chili peppers like jalapeños, serranos, or even a dash of hot sauce. Adjust the amount of heat based on your spice tolerance.
What tastes good dipped in hummus?
Hummus pairs well with various foods. There are plenty of options for dipping. One of my favourites is cucumber. But here I leave you with some ideas.
- Pita Bread: Pita bread is a classic and popular choice for dipping in hummus. Cut it into wedges or tear it into smaller pieces, and enjoy the combination of the soft, fluffy bread with the creamy hummus.
- Fresh Vegetables: Raw vegetables provide a refreshing and healthy option for dipping. Try carrot sticks, cucumber slices, bell pepper strips, cherry tomatoes, celery sticks, or radishes. They add a crisp texture, and their natural flavours complement the hummus well.
- Pretzels and Crackers: Pretzels, whole-grain crackers, or crispy breadsticks can add a satisfying crunch to your hummus. Opt for varieties with seeds or whole grains to add extra texture and depth.
- Tortilla Chips: If you prefer a bit of crunch with your hummus, tortilla chips are a great choice. Their sturdy structure makes them ideal for scooping up generous amounts of hummus.
- Falafel: Falafel, a deep-fried or baked ball made from ground chickpeas or fava beans, is a natural companion to hummus. Combining the crispy falafel exterior and the creamy hummus creates a delightful contrast in texture and flavour.
- Breadsticks and Grissini: Long and thin breadsticks, such as grissini, are another option that adds a crispy element to your hummus experience. These crunchy sticks are excellent for dipping due to their shape and texture.
- Roasted Vegetables: Roasted vegetables, like roasted cauliflower florets, zucchini slices, or sweet potato wedges, provide a delicious and savoury complement to hummus. The caramelized flavours of the roasted vegetables pair well with the creaminess of the hummus.
- Cheese: Mild cheese varieties like mozzarella can be cut into cubes or slices and enjoyed with hummus. The combination of creamy cheese and hummus creates a delightful balance of flavours.
- Tortilla Espanola: Spread some hummus in your tortilla Espanola, and you will love it.
These are just a few examples but feel free to get creative and try different foods to dip in hummus. Let me know what ideas you came up with or what you usually dip in your hummus.
How many days does homemade hummus last?
Homemade hummus last less than the hummus you buy at the store because it lacks all the preservatives to extend its shelf life.
However, if you store it properly, you can typically store homemade hummus for about 3 to 5 days.
Its duration also depends on the freshness of your ingredients and which specific ingredient.
To be safe, store your homemade hummus in an airtight container to help maintain its freshness. It also prevents it from drying out or absorbing odours from the fridge.
Ensure you handle the hummus with clean utensils or hands to avoid introducing contaminants that can reduce its shelf life.
Likewise, visually inspect your stored hummus for any signs of spoilage, such as mould growth or an off odour.
If the hummus appears or smells unusual, it’s best to discard it to avoid the risk of foodborne illnesses.
Hummus recipe with blender
Equipment
- 1 blender
- 1 Instant pot or pressure cooker
- 1 spatula
Ingredients
- 2 cups boiled chickpeas
- 1 tbsp garlic powder
- 1 tbsp onion powder
- 1 tsp cumin
- 1/3 cup olive oil
- 1 tsp salt
- 1/4 tsp black pepper
- 2 tbsp sesame seeds
- 1 bunch of cilantro
- 2 limes
Instructions
- Wash and rinse the dry chickpeas and place them in the instant pot with enough water to cover the beans—no need for soaking. Cook for 70 minutes on the multigrain settings. If you don’t have an instant pot, use the pressure cooker but adjust the amount of water so your beans don’t burn.
- Wait for the chickpeas to cool down to assemble your hummus recipe with the blender.
- Add the drained chickpeas along with the rest of the ingredients to the blender.
- Start blending on low speed, gradually increasing to high speed. Blend until the mixture is smooth and creamy.
- If necessary, stop occasionally to scrape down the sides of the blender to ensure all ingredients are incorporated.
- In case the mixture is too thick, add water from the boiled beans gradually, one tablespoon at a time, while blending until you reach the desired consistency. Blend briefly after each addition to incorporate the water.
- Taste the hummus and adjust the seasonings if needed. Add more salt, lemon juice, or garlic, according to your preference.
- Once the hummus reaches a smooth and creamy texture, transfer it to a serving bowl or container.
- You can drizzle a little extra olive oil over the top of the hummus and sprinkle with paprika or chopped cilantro for garnish. That is if you want picture-perfect hummus.
- Enjoy!!
Video
Notes
| Nutrition Facts | |
|---|---|
| Serving size: 25 g | |
| Servings: 20 | |
| Amount per serving | 25 g |
| Calories | 112 |
| % Daily Value* | |
| Total Fat 5.1g | 6% |
| Saturated Fat 0.7g | 3% |
| Cholesterol 0mg | 0% |
| Sodium 123mg | 5% |
| Total Carbohydrate 13.8g | 5% |
| Dietary Fiber 3.9g | 14% |
| Total Sugars 2.5g | |
| Protein 4.3g | |
| Vitamin D 0mcg | 0% |
| Calcium 37mg | 3% |
| Iron 2mg | 9% |
| Potassium 209mg | 4% |
| *The % Daily Value (DV) tells you how much a nutrient in a food serving contributes to a daily diet. 2,000 calories a day is used for general nutrition advice. | |
| Recipe analyzed by |
|